Spirograph
Summary
Creating a model by using Mekanimo’s GUI and then writing a script to perform some tasks is a very powerful technique to create sophisticated designs. The following tutorial demonstrates this mixed-mode (GUI + scripting) approach with a short example.
First, we will create a simple mechanism with a tracer to create pretty graphics by using the GUI. Then conduct a simple parametric study to generate many different graphic designs by writing a short script. And finally, we will create a collage (similar to Figure-1 but with 16 pictures instead of 4) of these designs by using PIL (Python Imaging Library).
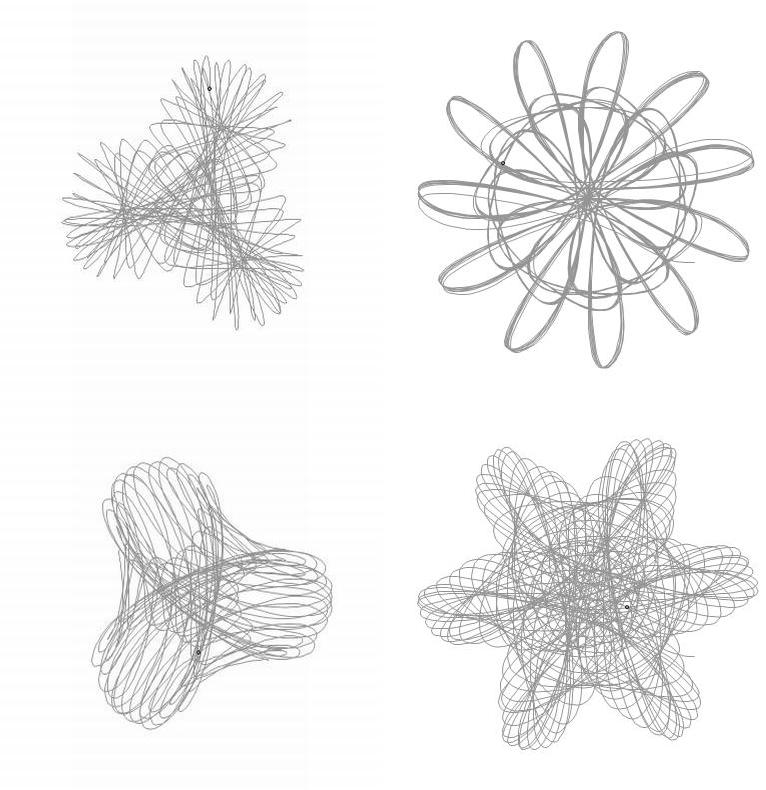
Figure 1
Model
Create the model shown in Figure-2 (if you set the grid and snap to grid options on, this task should take less than a minute) or copy and paste the code shown in mekanograf.mek. Your model should look like Figure-2. After you created the model, deactivate the box. Then to prevent the links from colliding with each oter, select all rectangles and then
Object -> Never collide

Figure 1: Spirograph mechanism
Auto-code (automatically created code)
Mekanimo automatically converts the GUI actions into Python code and displays it in the Code panel. Your code may look different.
Figure-3: Automatically generated code (auto-code)
Auto-code text
You can copy and paste this code snippet into Mekanimo’s code panel if you would like to have an identical model to the one in Figure-2.
rectangle(x=25.0, y=26.875, width=15.0, height=1.25,
          name='rectangle1', alias='r1', fillColor=(234, 240, 109, 150))

rectangle(x=31.875, y=21.25, width=1.25, height=12.5,
          name='rectangle2', alias='r2', fillColor=(113, 188, 167, 150))

rectangle(x=35.625, y=15.625, width=8.75, height=1.25,
          name='rectangle3', alias='r3', fillColor=(147, 146, 122, 150))

motor(body1=rectangle2, body2=rectangle3, b1x=0.0, b1y=-5.625,
      rpm=120, torqueLimit=5000, name='motor1', alias='m1')

motor(body1=rectangle1, body2=rectangle2, b1x=6.875, b1y=0.0,
      rpm=120, torqueLimit=5000, name='motor2', alias='m2')

motor(body1=rectangle1, body2=ground, b1x=-6.875, b1y=0.0,
      rpm=120, torqueLimit=5000, name='motor3', alias='m3')

trace(body=rectangle3, bx=3.75, by=0.0,
      name='trace1', alias='t1')

system.box.active = False
noCollision([rectangle1, rectangle2, rectangle3])
motor1.rpm = 50
motor2.rpm = 50
motor3.rpm = 30
Run
If you run this model, your simulation should look similar to Figure-4.
Figure 4: Spirograph in action
Highlight the graphics
Since our final product is a graphic design we need to hide the mechanical elements. To do this:
First hide everything: View -> Hide -> All
Then show only the trace elements: View -> Show -> Trace
We can also change the characteristics of the trace as shown below. Now, your results should look like the animation shown in Figure-5.
Editing trace style
>>> trace1.pen.Width = 2
>>> trace1.pen.Colour = color.navy
>>> trace1.pen.Style = wx.DOT_DASH
The default values for trace.pen are:
Width: 1
Colour: (155, 155, 155, 255)
Style: wx.SOLID
Other available line-styles:
- wx.SOLID
- wx.TRANSPARENT
- wx.DOT
- wx.LONG_DASH
- wx.SHORT_DASH
- wx.DOT_DASH
- wx.STIPPLE
- wx.USER_DASH
- wx.BDIAGONAL_HATCH
- wx.CROSSDIAG_HATCH
- wx.FDIAGONAL_HATCH
- wx.CROSS_HATCH
- wx.HORIZONTAL_HATCH
- wx.VERTICAL_HATCH

Figure 5
Step by step code generation
The steps we need to take can be summarized as :
- Run several different analyses with different rpm values and at the end of the each run capture the screen and save it into a file.
- As the final step, stitch these pictures together to form a collage like the one shown in Figure-1.
Step-1 can be further subdivided:
- Come up with a scheme to vary the RPM values.
- Run analyses according to this scheme.
- Capture screen at the end of each run.
If you are an experienced programmer you can skip the steps and study the final script. Individual steps are shown for the benefit of beginners.
Running one model and capturing the graphics into a file
>>> system.run(500) # run an analysis for 500 time-frames
>>> canvas.captureScreen('mekanograf_test.jpg') # Now save the canvas graphics as a pic.
Running n models and saving pictures
>>> n = 6
>>> incRPM = 7 # motor1's RPM increment for each iteration
>>> nofframes = 1500 # Number of time-frames
>>> picbasename = 'mekanograf'
>>> for i in range(n):
...     system.reinit()
...     motor1.rpm += incRPM
...     system.run(nofframes)
...     picname = '%s_%s_%s_%s.jpg' %(picbasename, m1.rpm, m2.rpm, m3.rpm)
...     canvas.captureScreen(picname)
...
Changing the parameters in a more methodical way
Code snippet above increments the motor1’s rpm value by a constant value (incRPM) on each iteration. In this case we have three motors and we may want to conduct a parametric study. The most comprehensive approach would be covering all combinations, but in many cases this is not practical. If we had only three parameters and three levels we could cover every possible case in 27 experiments (3**3 = 27). The code snippet below shows how to generate all combinations for three motors and three rpm levels.
Generating all combinations (full factorial design)
>>> levels = (20, 60, 100) #low, mid, high rpm values
>>> for i in levels:
...     for j in levels:
...         for k in levels:
...             print i, j, k
...
20 20 20
20 20 60
20 20 100
20 60 20
20 60 60
20 60 100
20 100 20
20 100 60
20 100 100
60 20 20
60 20 60
60 20 100
60 60 20
60 60 60
60 60 100
60 100 20
60 100 60
60 100 100
100 20 20
100 20 60
100 20 100
100 60 20
100 60 60
100 60 100
100 100 20
100 100 60
100 100 100
Random combinations
Since the range of rpm values we would like to cover are rather large, a full factorial design is out of question (it would be over 22 million combinations) for today’s hardware. Generating random combinations should be good enough for our purposes. Python’s random module provides many different functions to generate random numbers according to various distributions (gauss, circular uniform, gamma, log normal, etc.).
Generating a random combination
>>> from random import choice
>>> maxRPM = 140
>>> rpms = range(-maxRPM, maxRPM) # Negative sign indicates clockwise rotation
>>> choice(rpms)
90
>>> choice(rpms)
-57
>>> (choice(rpms), choice(rpms), choice(rpms))
(60, -130, 80)
Generating n random combinations
>>> combinations = [ ]
>>> n = 16
>>> for i in range(n):
...     combinations.append((choice(rpms), choice(rpms), choice(rpms)))
...
>>> combinations
[(126, 71, 135), (71, 4, 33), (-45, -20, -122), (-56, 25, 109),
(85, -61, -10), (-17, -114, -29), (79, 34, 44), (-79, -67, 65),
(137, -40, -136), (-129, -136, 12), (76, -59, 67), (22, -50, 38),
(-57, 25, 51), (-75, -40, 68), (-113, -15, 126), (-107, -32, -49)]
Potentially flawed results.
Can you see the problem with the code snippet above?
The problem is we can end up with the same combination more than once and it would be annoying to see the same pattern more than once in our collage. This is a subtle bug. These types of bugs are very difficult to track down since they may never show up when you test your program. What do you think we can do to prevent these types of bugs? Please give me feedback if you have a solution, I would like to hear about other solutions before I tell you my solution.
To address this, we can use a set to make sure we have no duplicates in the randomly generated combinations as shown below. Sets cannot contain any duplicates by definition.
Generating n unique random combinations
>>> combinations = set() # Start with an empty set
>>> n = 16
>>> while len(combinations) < n:
...     combinations.add((choice(levels), choice(levels), choice(levels)))
...
>>> combinations
set([(10, -65, 8), (83, -91, 38), (-106, 78, 127), (117, -58, -118),
(139, 94, 73), (63, -88, -24), (71, -95, 28), (119, 30, -20),
(-4, 13, 108), (-86, 5, -111), (136, 95, 84), (25, 71, 29),
(84, 134, 58), (-90, -95, -20), (-3, -67, -4), (31, 93, 60)])
Stitching pictures together
Since we learned how to generate the individual pictures, the last thing we need to figure out is how to put these pictures together in a collage. For this task we will use an external library called PIL. PIL is an excellent image manipulation library written by Fredrik Lundh. For more information about PIL please visit http://www.pythonware.com/products/pil/ . Mekanimo includes PIL so you don’t need to do anything other than importing it. The code snippet below demonstrates how to put two pictures in a single file.
bbox may be the most difficult to understand part of the code below without reading the PIL manual’s paste function definition. bbox stands for bounding box and in this case it can be specified by the upper left and lower right corners’ coordinate values (in pixels).
Stitching two pictures side by side
>>> from PIL import Image
>>> image1 = Image.open('first.jpg')
>>> image2 = Image.open('second.jpg')
>>> width1, height1 = image1.size
>>> width2, height2 = image2.size
>>> width = width1 + width2
>>> height = max([height1, height2])
>>> base = Image.new('RGB', (width, height))
>>> bbox1 = (0, 0, width1, height1)
>>> base.paste(image1, bbox1)
>>> bbox2 = (width1, 0, width, height2)
>>> base.paste(image2, bbox2)
>>> base.save('first_second.jpg')
See http://www.pythonware.com/library/pil/handbook/image.htm for more info about Image.paste method.
Putting it all together
We have seen examples of each required step to complete our task. The code below shows the final script. Please note the way this code is organized. All the parameters are listed along with comments explaining what they are in the first section, the rest of the code computes the other required values by using these parameters only. This is a simple and effective technique to create easy to maintain code. Each task is clearly defined and separated from each other. The whole script can be summarized as:
- Set design parameters and other variables
- Generate random combinations
- Run an analysis for each combination and capture the graphics into a picture
- Stitch the pictures together and save the result
Final script
from random import choice
from PIL import Image

# Set design parameters
width, height = 300, 300 # Dimensions (in pixels) of each individual pic. in the collage
nofframes = 1500 # Number of time-frames to run for each analysis
maxRPM = 140 # Maximum revolutions per minute value for the motors
rows, cols = 4, 4 # Number of pictures per row and column

# Set file names
picname = 'mekanograf' # Base name for each picture
collagename = 'mekanograf_collage.jpg' # Name of the final collage

# Generate random combinations
combinations = set() # Initiate an empty set
n = rows * cols # Total number of unique combinations
rpms = range(-maxRPM, maxRPM + 1) # Range of rpm values to choose from
while len(combinations) < n:
    combinations.add((choice(rpms), choice(rpms), choice(rpms)))

# Create a picture for each combination
pictures = [ ]
for combination in combinations:
    system.reinit()
    motor1.rpm, motor2.rpm, motor3.rpm = combination
    system.run(nofframes)
    pic = '%s_%s_%s_%s.jpg' %(picname, motor1.rpm, motor2.rpm, motor3.rpm)
    canvas.captureScreen(pic)
    pictures.append(pic)

# Stitch the pictures together to create a collage
base = Image.new('RGB', (width * cols, height * rows))
ind = 0
for row in range(rows):
    for col in range(cols):
        im = Image.open(pictures[ind])
        im = im.resize((width, height))
        bbox = (row * width, col * height, (row + 1) * width, (col + 1) * height)
        base.paste(im, bbox)
        ind += 1

# Save the result to a file
base.save(collagename)
Are we there yet?
If this is a script we want to use just once we are done, just paste it in the code editor. What if we would like to use this script multiple times or share it with others? Then, we need to tidy it up a little bit to make it easier to use. For this we may want to create a function. The advantage of a function should be obvious, we can call this function with different parameters without having to modify our script every time we need a new collage.
I would also like to demonstrate another technique that I find very useful for designing easy to maintain code. In ‘Putting it all together’ we summarized the steps we need to take. Now, I will create a function for each step and the main function (collage) will be almost identical to that summary.
Auto-code + collage function
from random import choice
from PIL import Image

rectangle(x=25.0, y=26.875, width=15.0, height=1.25,
          name='rectangle1', alias='r1', fillColor=(234, 240, 109, 150))

rectangle(x=31.875, y=21.25, width=1.25, height=12.5,
          name='rectangle2', alias='r2', fillColor=(113, 188, 167, 150))

rectangle(x=35.625, y=15.625, width=8.75, height=1.25,
          name='rectangle3', alias='r3', fillColor=(147, 146, 122, 150))

motor(body1=rectangle2, body2=rectangle3, b1x=0.0, b1y=-5.625,
      rpm=120, torqueLimit=5000, name='motor1', alias='m1')

motor(body1=rectangle1, body2=rectangle2, b1x=6.875, b1y=0.0,
      rpm=120, torqueLimit=5000, name='motor2', alias='m2')

motor(body1=rectangle1, body2=ground, b1x=-6.875, b1y=0.0,
      rpm=120, torqueLimit=5000, name='motor3', alias='m3')

trace(body=rectangle3, bx=3.75, by=0.0,
      name='trace1', alias='t1')

system.box.active = False
noCollision([rectangle1, rectangle2, rectangle3])

def collage(collagename, rows=4, cols=4, width=300, height=300, nofframes=1500,
               maxRPM=140, picname='mekanograf'):
    def gencombinations(n, maxRPM):
        combinations = set()
        rpms = range(-maxRPM, maxRPM + 1)
        while len(combinations) < n:
            combinations.add((choice(rpms), choice(rpms), choice(rpms)))
        return combinations

    def genpictures(combinations, picname):
        pictures = [ ]
        for combination in combinations:
            system.reinit()
            motor1.rpm, motor2.rpm, motor3.rpm = combination
            system.run(nofframes)
            pic = '%s_%s_%s_%s.jpg' %(picname, motor1.rpm, motor2.rpm, motor3.rpm)
            canvas.captureScreen(pic)
            pictures.append(pic)
        return pictures

    def stitchpictures(collagename, pictures, rows, cols, width, height):
        base = Image.new('RGB', (width*cols, height*rows))
        ind = 0
        for row in range(rows):
            for col in range(cols):
                im = Image.open(pictures[ind])
                im = im.resize((width, height))
                bbox = (col*width, row*height, (col+1)*width, (row+1)*height)
                base.paste(im, bbox)
                ind += 1

        base.save(collagename)

    combinations = gencombinations(rows*cols, maxRPM)
    pictures = genpictures(combinations, picname)
    stitchpictures(collagename, pictures, rows, cols, widht, height)

# collage function can be invoked from the interpreter in Mekanimo as shown below
# >>> collage('spirotest.jpg', 3, 3)
Note
Function docs and comments are omitted for brevity.
Further explorations
- We set the RPM values as design parameters. What else could we set as a parameter?
- In Figure-1 three items have number of spikes evenly divisible by three, this looks natural since we have three bars to begin with. What do you think about the upper right item?
- How would you add color to this process? Can we use color in a parametric way too?
- What would happen if we lowered the torqueLimit attribute of the motors to a very low value?
- Do unique combinations guarantee unique patterns? If not, how can we prevent identical patterns?
- If the only data we had were the trace point’s position vs. time, could we compute the three RPM values?
- With a little bit of tweaking we could simulate these items too: Hypotrochoid, Epitrochoid, Epicycloid, Hypocycloid, Cycloid.
- Finally the real thing that inspired me to create this model.
![]()
Table Of Contents
- Spirograph
- Summary
- Model
- Auto-code (automatically created code)
- Auto-code text
- Run
- Highlight the graphics
- Editing trace style
- Step by step code generation
- Running one model and capturing the graphics into a file
- Running n models and saving pictures
- Changing the parameters in a more methodical way
- Generating all combinations (full factorial design)
- Random combinations
- Generating a random combination
- Generating n random combinations
- Potentially flawed results.
- Generating n unique random combinations
- Stitching pictures together
- Stitching two pictures side by side
- Putting it all together
- Final script
- Are we there yet?
- Auto-code + collage function
- Further explorations