Rigid Bodies
How can 2D objects have mass or weight?
Rigid bodies in Mekanimo are assumed to have thickness of one unit. Their masses are computed by multiplying their densities with their areas. Their weights are computed by multiplying their mass with the acceleration of gravity defined as ‘system.gravity’. To be physically sensible, their masses, weights, moments of inertias, areas, and densities stay consistent. For example, if you modify the weight property of a rigid body, mass, moment of intertia, density values would be recomputed.
Translations and rotations
Translation and rotation operations change the position and orientation of a rigid body and they do not modify the shape. Mekanimo allows users to translate, reorient, or rotate (translate + reorient) a rigid body via GUI or code.
Translate (move)
Rigid bodies can be moved via GUI or code. You can click on a rigid body and drag it to change its position or use the object tree. Rigid bodies can also be repositioned by assigning a new positon (x, y pair) via code as shown below.
>>> circle1.position = [20, 35]
It is also possible to change the x and y coordinates of a rigid body individually.
>>> rectangle1.x = 42
>>> polygon2.y += 25
The object tree can be used to assign coordinates to rigid bodies too (see Figure1).
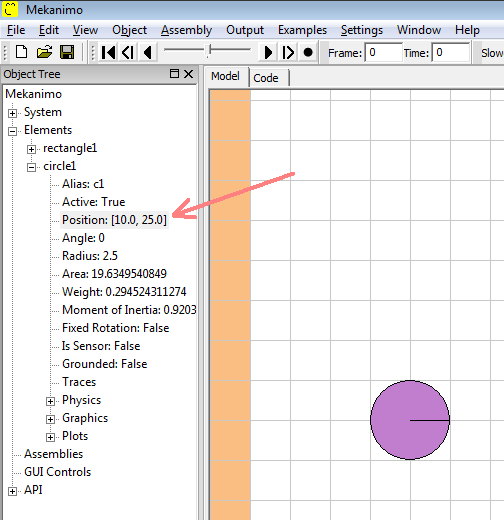
Figure 1: Modifying position from the object tree
Reorient (rotate)
Reorientation changes the orientation angle of a rigid body but not its position. When rigid bodies are selected their rotation handles become visible as depicted in Figure 2. By default, root of the rotation handle is located at the center of gravity (or local [0, 0] point). When you click and drag the tip of the rotaition handle, the selected rigid body rotates about the root of the rotation handle. Since, the center of gravity and root of the rotation handle is coincident by default, this action changes only the orientation angle but not the position of the selected rigid body.
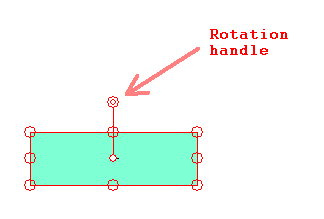
Figure 2: Rotation handle
Two examples of reorienting with code is shown below. Please note that both examples would yield the same transformation.
>>> circle1.rotate(.2)
>>> circle1.angle += .2
In addition to rotation operations, orientation of the rigid bodies can be specified directly as shown below.
>>> circle1.angle = pi / 3
Note
All angles in Mekanimo are specified in radians and counter-clockwise direction is the positive rotation direction.
And finally, if you need to rotate a rigid body by 30, 45, 60, 90, or 180 degrees via GUI, you can use the popup menu as shown below.

Figure 3: Rotating by frequently used angles.
Rotate about a point
When rigid bodies are rotated about a point their rotation angles and potentially positions change accordingly. As explained in the section above, if the center of rotation does not coincide with the center of gravity of the rigid body in question, then both orientation angle and position of the rigid body are altered due to rotation. To rotate a rigid body about a point via GUI, you can drag the root of the rotation handle to reposition it. Figure 4 shows a rectangle with repositioned rotation handle.
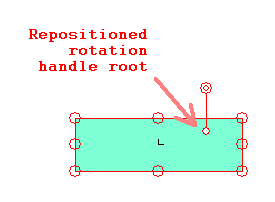
Figure 4: Repositioned rotation center
>>> circle1.rotateAbout([25, 35], .2)
To relocate the rotation handle root at the center of gravity, right click on the canvas to bring up the popup menu and then select the Reset rotation center option as shown below.
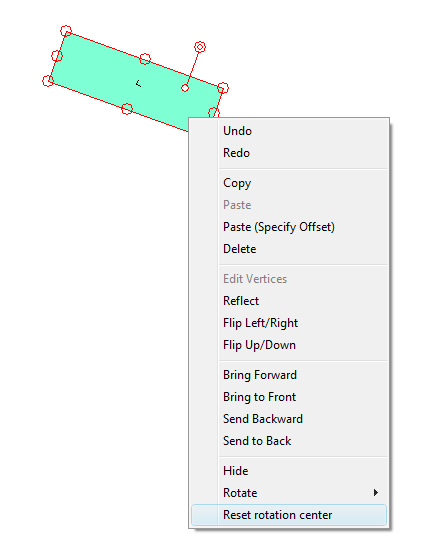
Figure 5: Reseting rotation handle root
Alternatively, rotation handle root can be relocated to the default position from code as shown below.
>>> rectangle1.rotCenter = [0, 0]
Reflect
Rigid bodies and connectors can be reflected either horizontally or vertically by using the popup menu or from the Python interpreter as shown below.
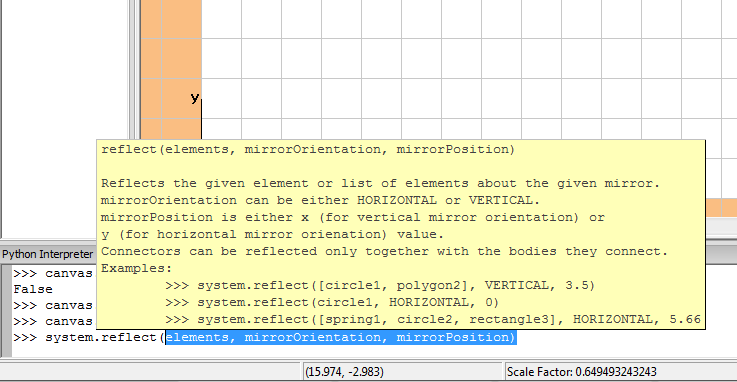
Figure 6: Reflecting elements from the Python interpreter.
>>> system.reflect(polygon1, VERTICAL, 25)
>>> system.reflect([circle1, circle2, pin1], HORIZONTAL, 33.5)
When you use the popup menu, outlines of the selected elements move according to the mouse position. If the vertical distance between the mouse cursor and center of gravity of the selected element/s is larger than that of the horizontal distance then Mekanimo displays vertical reflection outlines. Reflection operation is completed upon left-click. Press Esc key to cancel the operation without reflecting the selected objects.
Circles
In Mekanimo, circles are defined by their center point and radius. The first circle of the model is named Circle1 with an alias c1 , the second one is named Circle2 with and alias c2 and so on. Like any other element, circles can be renamed if desired.
When the canvas is in CIRCLE mode, a circle can be created by clicking and dragging. Where you click defines the center and the distance between the center and where you release the mouse defines the radius. Circles can be created from the Python interpreter as shown below:
>>> circle(40, 50, 3)
Modifying Circles
Like all other rigid bodies circles can be resized, scaled and rotated. Circles can be resized by assigning a new radius or an area value. Modification of either the area or the radius would cause the other mass properties to be recomputed.
Polygons
Mekanimo supports only simple polygons that can be either convex or concave (see Figure 6). Simple polygons have no intersecting edges, Figure 7 depicts a self intersecting polygon.

Figure 6: Simple polygons
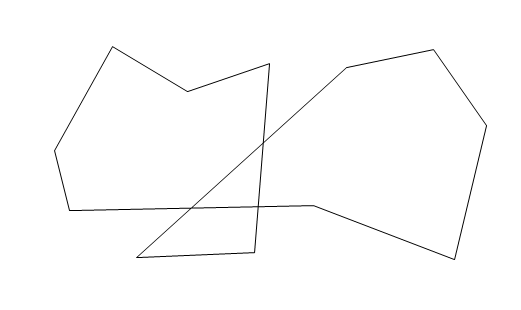
Figure 7: A self-intersecting polygon
By default, each polygon can have maximum of 64 vertices. This limit can be adjusted by modifying the MAXVERTICES default value as shown below.
>>> defaults[MAXVERTICES] = 128
Modifying Polygons
Like all other rigid bodies polygons can be resized, scaled and rotated. In addition, individual vertices can be modified too. While scaling does not change an element’s position resizing may cause the position of an element to be modified as well. To resize a polygon with GUI, simply drag any of the resizing handles. In additon to direct scaling, polygons can be resized by changing their areas.
polygon1.resize(pos=[45.5, 18.0], scaleX=1.2, scaleY=1.5)
polygon1.scale(scaleX=2, scaleY=2)
To edit vertices right click on the canvas to bring up the popup menu and select Edit Vertices. Now you can drag the vertices. To finish the operation, click on an empty area in the canvas.
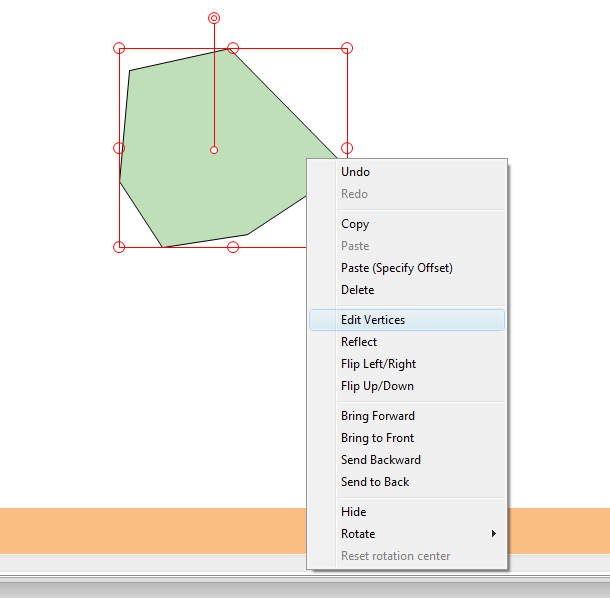
Figure 8: Editing vertices
To programmatically edit vertices you need to specify the positions of all vertices as shown below
system.editVertices(polygon1, [[35.088471664191985, 21.203194107239007],
[45.127152060097174, 35.27611055009676], [30.074017533651386, 43.1123577014774],
[20.658360670195588, 41.01961089298856], [19.702083020000863, 30.672140562127066],
[23.821432897762772, 24.393900136660545]])
Rectangles
Modifying Rectangles
Like all other rigid bodies rectangles can be resized, scaled and rotated. While scaling does not change an element’s position resizing may cause the position of an element to be modified as well. To resize a rectangle with GUI, simply drag any of the resizing handles.
rectangle1.resize(pos=[45.5, 18.0], scaleX=1.2, scaleY=1.5)
rectangle1.scale(scaleX=2, scaleY=2)
Friction
Friction can be defined as resistance to sliding.